 how-to
Sleeper Sofa Mechanism Installation Guide for Hotels
Table of Contents
- What You'll Need Before You Start
- Sleeper Sofa Repair Tools and Safety Precautions
- Step-by-Step Sleeper Sofa Mechanism Installation Guide
- Sofa Bed Mechanism Troubleshooting: Common Issues After Installation
- Mechanism Compatibility Matrix: Matching Parts to Frame Types
- Two-Person vs. Solo Installation: What Works Best
- Post-Installation Alignment Testing and Maintenance
- Frequently Asked Questions
Last Updated: September 11, 2026
What You'll Need Before You Start
Hospitality Sleeper has supported hotel renovation teams through decades of mechanism replacements, and the pattern is consistent: properties that stage tools and protect the frame first finish in a single visit, while rushed installs become return trips.
Sleeper sofa mechanism installation means removing a worn fold-out bed mechanism and mounting a replacement so the mattress platform, hinge assembly, and support legs align and lock correctly, disassembly, then precise re-installation.
Sleeper Sofa Repair Tools Checklist
Gather these before you touch the sofa. Missing one socket size mid-job stalls the install and takes a guest room out of service.
- Socket set (standard and metric)
- Adjustable wrench and locking pliers
- Phillips and flathead screwdrivers
- Tape measure and pencil
- Replacement bolt hardware and washers
- Drop cloth and upholstery protection pads
- Work gloves and safety glasses
- Flashlight or work light
- Lubricant for pivot points and spring tension points
Sleeper Sofa Repair Tools and Safety Precautions
Safety comes down to two risks: stored spring tension and mechanism weight. Tension springs under a mattress platform hold real energy, and a released spring can snap a finger or send a bolt across the room.
Before disassembly:
- Open the fold-out bed fully and lock the mechanism in place so tension is controlled.
- Never cut or unbolt a tension spring while it is under load.
- Recruit a second person for any mechanism over roughly 50 pounds (osha.gov). One person supports the frame; the other works the bolts.
- Wear gloves. Square-tube steel edges are sharp, and old grease hides burrs.
Fold these checks into your standard room inspection rotation so a failing locking mechanism is caught before a guest reports it.
Step-by-Step Sleeper Sofa Mechanism Installation Guide
A maintenance technician in work clothes kneeling beside an open sleeper sofa frame in a hotel room, using a wrench to align a mounting plate on the square-tube steel mechanism, with tools laid out on a protective drop cloth nearby
Work through these steps in order. Skipping the measurement stage turns a one-hour job into a two-day one.
Step 1: Remove the Old Mechanism Safely
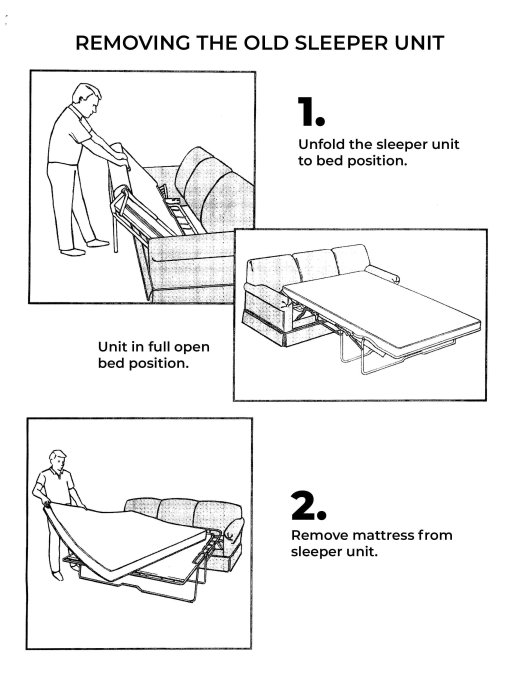
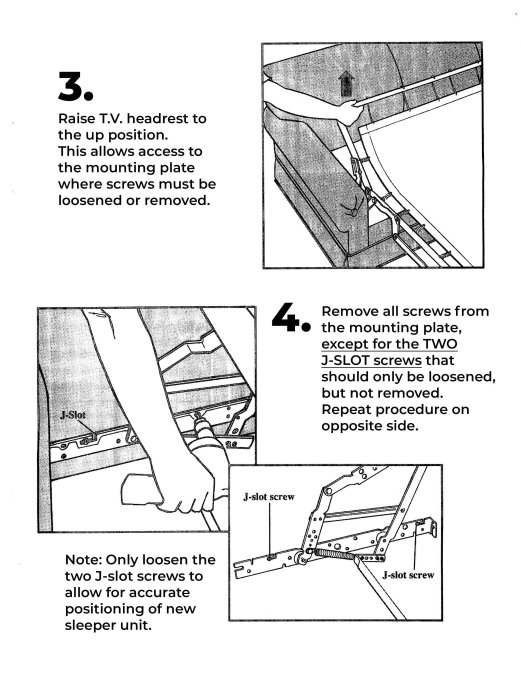
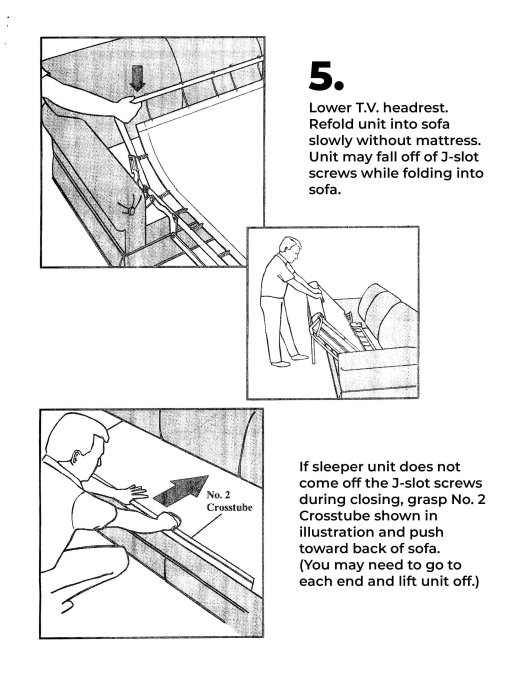
Open the bed, lock it, and lay a drop cloth under the frame. Photograph the bolt layout, then loosen mounting bolts in a diagonal pattern. Keep every bolt and washer in a labeled bag as reference for the replacement kit. Once the frame is supported, disconnect the tension springs last, then lift the old mechanism clear without dragging it across the frame edge.
Step 2: Measure the Frame and Mounting Plate Alignment
Measure the interior frame width at three points: front, middle, and rear. Note the distance between existing mounting plate holes and the frame rail height, and write the numbers down. Frame alignment determines whether the new mechanism opens square, a mechanism bolted to a twisted frame will bind no matter how well it is installed, so correct the frame first.
Step 3: Install the New Mechanism and Secure Bolt Hardware
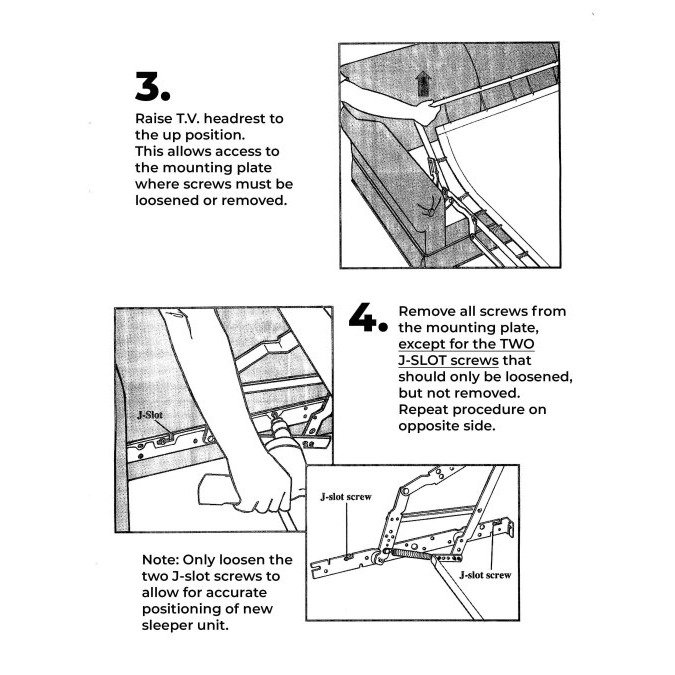
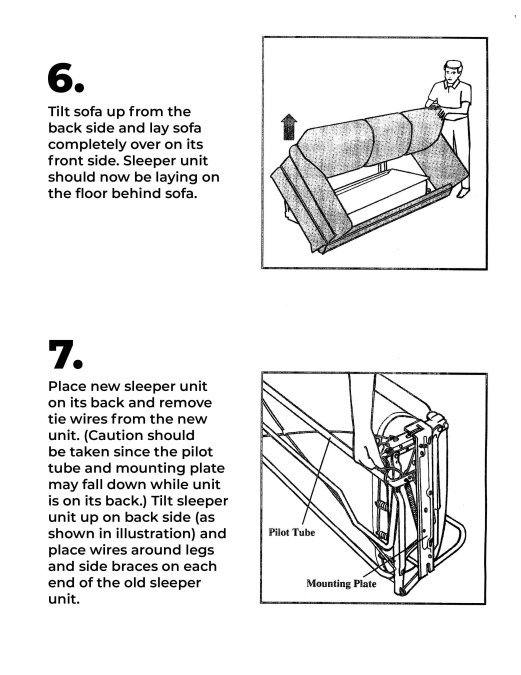
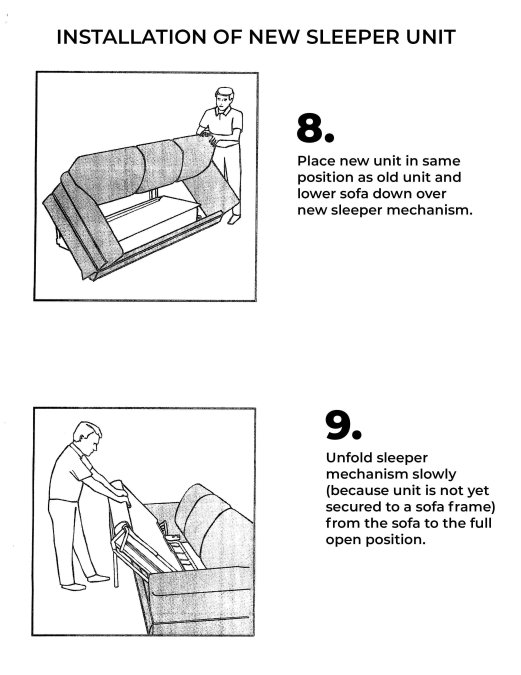
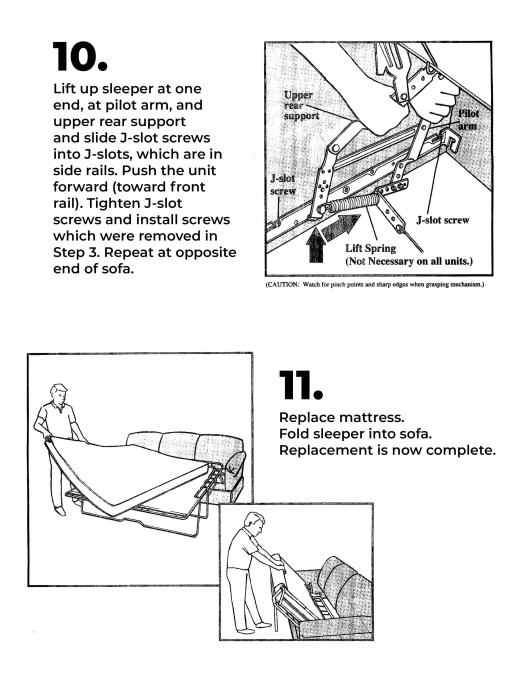
Set the replacement mechanism into the frame and align the mounting plate holes with the frame rails. Start every bolt by hand before tightening any, then tighten in a diagonal sequence to spread load evenly. Reconnect tension springs once the mechanism is fully seated, and follow the torque specifications supplied with your replacement kit, over-tightening distorts a mounting plate, and under-tightening lets the mechanism work loose.
Sofa Bed Mechanism Troubleshooting: Common Issues After Installation
Sofa bed mechanism troubleshooting starts with the symptom, not the part. Most post-installation problems trace back to alignment or tension, not a defective mechanism.
Symptom | Likely Cause | Fix |
|---|---|---|
Bed opens unevenly | Mounting plate misalignment | Loosen bolts, realign plate, retighten diagonally |
Frame binds mid-fold | Uneven spring tension | Adjust tension springs on both sides equally |
Mechanism rocks when open | Loose bolt hardware | Re-torque all bolts to specification |
Bed will not lock | Faulty or misaligned safety latch | Check latch engagement and reset position |
Squeaking at pivot points | Dry pivot points | Apply lubricant to pivot and hinge points |
Support legs lift off floor | Incorrect frame height | Recheck clearance measurements and remount |
If a symptom persists after these fixes, the mechanism may be the wrong size class for the frame, a compatibility question, not a repair one.
Mechanism Compatibility Matrix: Matching Parts to Frame Types
Component compatibility is where most generic guides stop short. The mechanism must match the frame's tube profile, width, and mounting pattern, or it will never sit correctly, so identify the mechanism series and frame class before ordering. hotel maintenance solutions.
Identify Your Mechanism Series First
Sleeper sofa mechanisms are commonly grouped by series number stamped or etched on the crossbar, the mounting plate, or a tag riveted to the side rail. The two most common families are the 2500 series and the 3000 series. The number is not standardized across manufacturers, but the physical traits that travel with each series are consistent enough to use as a starting point:
- 2500-class mechanisms typically use a lighter square-tube frame, a four-point mounting plate, and a single tension spring per side. They are common in standard guest room sofas and lighter residential frames.
- 3000-class mechanisms typically use a heavier-gauge square tube, a six-point mounting plate, and paired tension springs per side. They show up in contract-market and higher-use frames.
If the stamp is missing or painted over, measure instead of guessing. Record the interior frame width at the front, middle, and rear rails, the vertical distance between the top and bottom mounting holes, and the horizontal hole spacing. Those three numbers match a series far more reliably than a visual comparison.
Compatibility Matrix
Frame Type | Typical Tube Profile | Mounting Pattern | Best Match |
|---|---|---|---|
Standard hotel sofa | Square tube, light gauge | Four-point plate | 2500-class square-tube mechanism |
Contract-market sofa | Square tube, heavier gauge | Six-point plate | 3000-class heavy-duty square-tube unit |
Custom-sized frame | Varies by spec | Custom plate | Made-to-dimension mechanism |
Older refurbished frame | Mixed or round tube | Legacy pattern | Adapter plate or custom build |
Measurement Tolerances That Matter
Small measurement errors compound once the mechanism is under load. Keep these within tolerance before mounting anything:
- Interior frame width: front, middle, and rear measurements should agree within about 1/8 inch. A larger spread means the frame is racked and needs correction first.
- Mounting plate hole spacing: should match the frame rail holes within about 1/16 inch. If it is off by more, do not enlarge the holes, that weakens the rail.
- Frame rail height: the plate should sit flush against the rail with no gap at any corner. A visible gap is a sign the plate is the wrong pattern.
When to Stop and Ask for a Match
If the frame is non-standard, the tube profile is mixed or round, or the plate pattern does not match any stock unit, do not force a stock mechanism into the frame. Work directly with a manufacturer that builds to spec. Hospitality Sleeper builds American-made mechanisms on a square-tube frame and consults with procurement teams to identify the correct replacement, including custom-sized units for hospitality FF&E projects. A wrong-class mechanism will bolt in and still fail: it will bind mid-fold, rock when open, or wear out the mounting plate within months of guest use.
Two-Person vs. Solo Installation: What Works Best
Two people is the right answer for nearly every full mechanism replacement. One person can manage a light mechanism on an accessible frame, but under spring tension or with a heavy-duty unit, solo installation becomes a safety problem rather than a time-saver. A practical split: the second person supports and aligns the mechanism while the first threads and tightens bolt hardware, which prevents the plate from shifting mid-install. Solo installation works only in narrow cases: a lightweight mechanism, the frame already blocked and stable, and no tension springs to manage, and even then, use a support block so the mechanism cannot drop.
Post-Installation Alignment Testing and Maintenance
Operational testing is not optional. The frame settles slightly after the first few cycles, and the adjustments you make in the first hour keep the mechanism from squeaking, binding, or jamming later. Run the bed through a full open-and-close cycle at least three times before the room goes back into service, watching for binding, rocking, and latch engagement at each pass (cpsc.gov).
Alignment Testing Sequence
Work through these checks in order after each cycle, correcting before moving on, a misalignment early in the sequence shows up as a false symptom later.
- Mounting plate flush check. Run a finger along the plate-to-rail joint at all four corners. Any gap means the plate is not seated. Loosen the bolts on that corner, reseat, and retighten diagonally.
- Crossbar level check. Lay a torpedo level across the crossbar front to back. If it is off, the frame rails are not parallel, correct the frame, not the mechanism.
- Latch engagement check. Open the bed fully and confirm the safety latch drops into its catch without force. If it needs a push, the plate is slightly forward or back of the correct position.
- Support leg contact check. Both legs should rest flat on the floor with no rocking. A leg that lifts means the frame height is off; a leg that digs in means the mechanism is mounted too low.
- Weight distribution check. Press down across the mattress platform at the head, middle, and foot. Even resistance across all three points means the tension is balanced.
Adjusting Tension Springs After Installation
Tension springs are the most common source of post-install squeaks and uneven opening. Adjust them in matched pairs, never one side at a time.
- With the bed open and locked, note the position of the spring hook on each side. They should sit at the same link or notch.
- If the bed opens unevenly, move the hook one link on the side that lags, then cycle the bed and recheck. Move in single-link increments, a two-link jump usually overshoots.
- If the frame binds mid-fold, the springs are too tight. Move both hooks one link toward the relaxed position and cycle again.
- If the frame rocks when open, the springs are too loose. Move both hooks one link toward the tensioned position.
Lubrication and Maintenance Schedule
Once alignment is set, maintenance keeps it set. Lubricate pivot points and hinge assemblies on a set schedule and re-check bolt hardware at the same interval. A simple lubrication routine extends the working life of any mechanism and keeps guest comfort consistent across a renovation cycle.
- Pivot points and hinge assemblies: lubricate at each scheduled room inspection. Use a light machine oil or dry lubricant, heavy grease collects dust and turns into grit.
- Tension spring hooks: inspect for wear at each lubrication cycle. A hook that has elongated or shows a flat spot is close to failing.
- Bolt hardware: re-torque to the specification supplied with your replacement kit at each lubrication cycle. Bolts that keep loosening after re-torque indicate a plate that is not seated flush.
- Safety latch: test engagement at every cycle. A latch that needs force to engage is a sign the plate has shifted.
U.S. Consumer Product Safety Commission guidance on furniture tip-over and stability is worth reviewing for any property updating guest room furniture, since stability checks belong in the same maintenance rotation as mechanism service.
Frequently Asked Questions
How do you safely remove an old sleeper sofa mechanism?
Fold the bed open, remove the mattress, and support the frame with blocks. Disconnect tension springs and pivot points, then unbolt the mounting plate from the sofa frame. Keep the hardware organized. Because mechanisms are heavy, have a second person help lower the unit to the floor. Inspect the frame for cracks or bent crossbars before installing a replacement kit.
Can a single person install a sleeper sofa mechanism?
Solo installation is possible for smaller mechanisms, but a two-person approach is safer and faster for most commercial-grade units. One person can hold the frame aligned while the other secures bolt hardware and checks the locking mechanism. For large fold-out bed mechanisms in hospitality settings, always use two people to avoid injury and frame misalignment.
How do you troubleshoot a sofa bed mechanism that won't close?
Start by checking for obstructions in the hinge assembly and pivot points. Lubricate the lubrication points with a dry silicone spray. Verify the safety latch is not stuck and that tension springs are seated correctly. If the frame still won't fold, inspect the crossbar for bending and confirm the mounting plate is not misaligned. Persistent issues may require a replacement kit.
What are the common signs that a sleeper sofa mechanism needs replacement?
Watch for difficulty opening or closing, squeaking that lubrication does not fix, visible bending in the crossbar or support legs, and a mattress platform that sags. Loose bolt hardware and a locking mechanism that fails to engage are also red flags. In hospitality settings, these signs usually appear after years of heavy use and indicate it is time for a new mechanism.